
Most blinds can be measured and installed at home with a tape measure, spirit level, drill and the brackets supplied. Measure the width at three points and the drop at three points, use the smallest figure for each, decide between an inside or outside mount, then fix the brackets level before hanging the headrail. Allow 30 to 45 minutes for your first window.
With the right tools and a careful approach to measuring, most people can install blinds themselves without calling in a professional. This guide covers every step, from choosing your mount type and taking accurate measurements through to hanging the blinds and solving the problems that most commonly come up along the way.
A single standard window takes 30 to 45 minutes the first time and closer to 15 minutes once you have done a few. Add roughly 20 minutes per window if you are removing old blinds and filling the previous fixing holes.
Handle it yourself when the window sits at ground level, the frame is timber or plasterboard over timber, and the blind is under 2400 mm wide. That covers the majority of Australian homes.
Bring in a professional installer when any of the following apply:
Before you begin, ensure you have all the necessary tools and materials. You will need a measuring tape, a level, a screwdriver, a drill, and the mounting hardware and brackets that come with your blinds. You’ll also need the blinds and any additional hardware or accessories, such as a valance.
Measuring and installing blinds yourself is a great way to save money and customise the fit to your specific window. With the right tools and materials, you can achieve a professional-looking installation by following the steps outlined in this guide.
Gather these items before you touch the window frame:
Having everything within arm’s reach avoids stopping mid-installation to hunt for a tool, and stops a half-drilled bracket sitting open while you go looking.
Run through this before you drill a single hole.
Measuring correctly before you order is the single step that determines whether your blinds fit, sit level and operate smoothly. Take all measurements in millimetres, which is the standard unit used by Australian blind manufacturers, and round down to the nearest whole millimetre.
The figures you supply are the figures we work from, so check the deductions and fitting types applied to a custom order before you submit them. Inside recess blinds receive a standard 10 mm deduction at the factory, and outside mount blinds are made to the exact size given.
Your first decision shapes every measurement that follows. Use the table below to settle it before you pick up the tape measure.
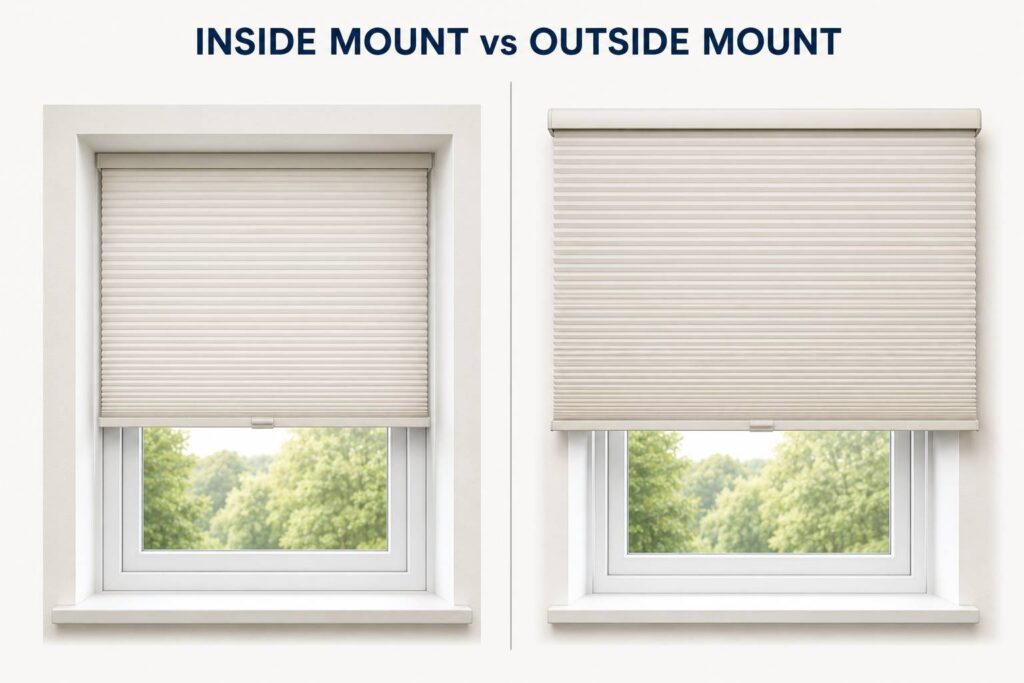
| Mount type | What it means | Best suited to |
|---|---|---|
| Inside mount | The blind sits within the window recess | Deep frames with at least 60 mm of recess depth, where you want a clean, built-in look |
| Outside mount | The blind is fixed above and outside the frame | Shallow frames, small windows you want to appear larger, or any recess too shallow to take the barrel and brackets |
Once you know your mount type, take every measurement accordingly. Mixing the two is the most common cause of a blind that does not fit.
Windows are rarely square, particularly in older Australian homes that have settled. Measure the width at three points: the top, the middle and the bottom of the opening. Record all three, then work from the smallest figure.
Measure the height at three points as well: left, centre and right. Again, work from the smallest figure.

Width overlap is only half of the outside mount measurement. You also need to set how far above the opening the headrail sits, and decide whether it clears the architrave.
Allow 50 to 100 mm above the top of the opening for the headrail and brackets, then choose one of two positions:
Whichever you choose, measure the drop from the underside of the bracket position down to where the blind finishes, not from the top of the window opening. Measuring from the opening is the most common outside mount error, and it produces a blind that finishes 50 to 100 mm short of where you wanted it.
For angled or sloped windows, measure the longest point for the width and take the vertical drop from the highest point of the opening down to where the blind will end. Note the angle separately and confirm with your supplier whether a standard blind can be cut to suit.
Bay windows, corner windows and skylights each need a different approach again, because the width is measured across an angle rather than a flat plane.
Mark the bracket positions before you put the tape measure away. This is the step that decides whether the blind hangs level, and a pencil mark is far easier to correct than a drilled hole.
Lay the spirit level across the two end marks and check they are level with each other before you mark anything else. Older homes settle, so a level bracket line rarely matches the top of the window frame. Trust the spirit level, not the frame.

Use this table as a summary once you have worked through the sections above.
| Measurement | Where to measure | Points | Use |
|---|---|---|---|
| Width | Top, middle, bottom | 3 | Smallest reading |
| Height | Left, centre, right | 3 | Smallest reading |
| Recess depth | Front to back of the frame | 1 | Confirm against the minimum for your blind type |
| Bracket positions | 75 to 100 mm in from each end | 2 or more | Check level across both marks |
Different blind mechanisms need different allowances, mostly around how much room the barrel or stack takes up. The table below sets out what to watch for with each.
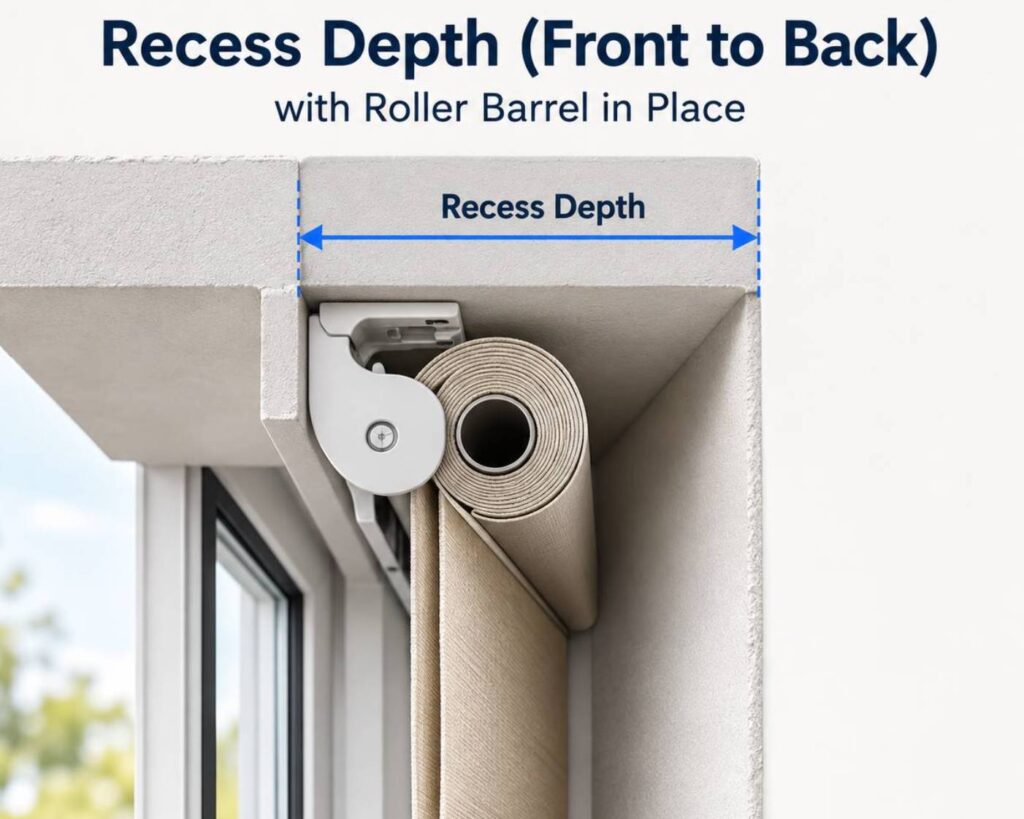
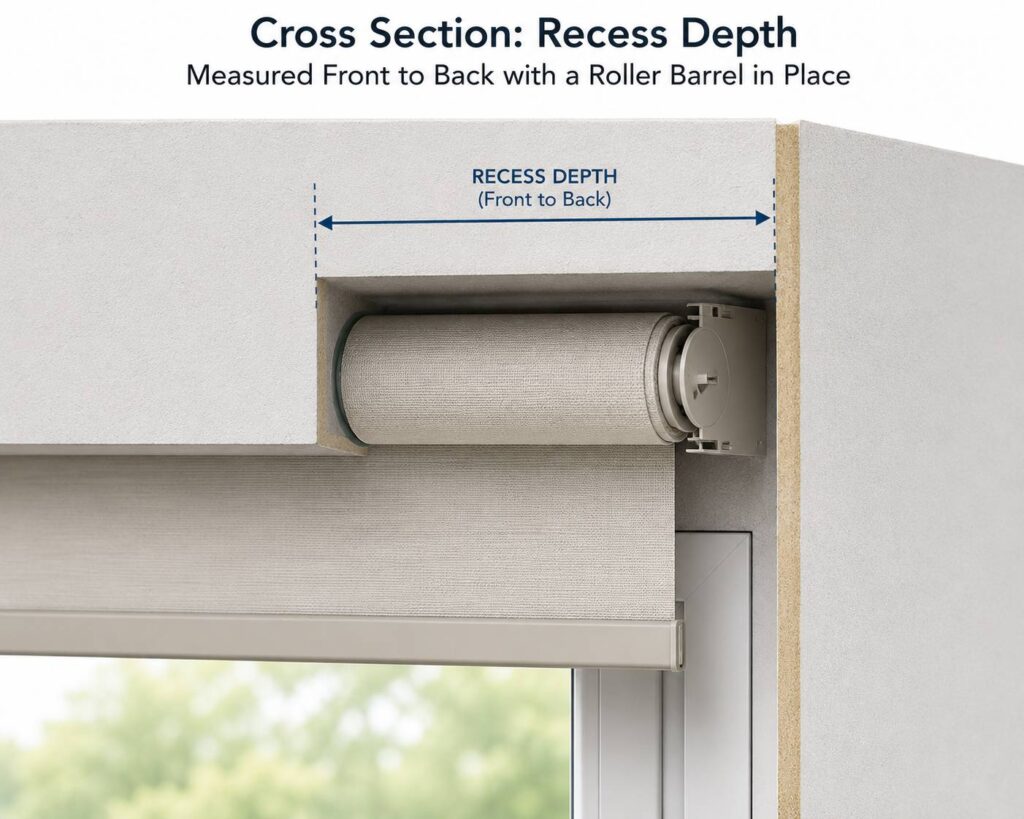
| Blind type | Minimum recess depth | Inside mount | Outside mount |
|---|---|---|---|
| Roller | 50 mm minimum, 70 mm recommended | The barrel and bracket need full depth to sit flush. Below 50 mm the blind protrudes past the face of the frame. Choose your roll direction, because a back roll sits closer to the glass than a front roll. | Mounts above the frame on timber or wall. Allow 50 to 100 mm of clearance above the opening. |
| Venetian | 50 mm minimum, 70 mm recommended | Slat width of 25 mm or 50 mm changes the stacking height when the blind is raised, and the slats need room to rotate without catching the frame. | Select Face as the fitting type when ordering timber venetians. Allow extra height so the raised stack does not sit across the glass. |
| Vertical | 70 mm minimum | Width must account for stack direction: left, right or split. Confirm the direction when you order. | Fix the header track to the wall or ceiling above the frame, into the lintel. |
If your recess is shallower than the minimum, an outside mount is the better option. It is not a compromise, and on a shallow frame it usually looks better than a blind sitting proud of the reveal.
Beyond width and drop, four choices affect how the finished blind sits and operates. Settle them while you are still at the window.
Roller blinds carry more bracket variation than any other type, and the bracket options and minimum recess depths decide whether an inside mount is possible at all.
Remove the existing blind or curtain track before you fit anything new. Note how the old brackets were fixed, which fixing points were used, and whether any of the holes can be reused. Fill the holes you will not reuse with wood filler, let it dry fully, then sand flush.
Reusing an old hole saves work, but only if it sits where your new bracket mark sits. Do not move a bracket mark to suit an old hole, because the blind will hang out of level.
Wipe the frame and surrounding wall with a damp cloth to remove dust and grime. Brackets and fixings grip best on a clean, dry surface. Let the surface dry completely before you drill.
Before you lift anything to the window, unpack the blind on a flat surface and check:
Read the manufacturer’s installation sheet in full before you drill a single hole. It carries the exact bracket positions, screw sizes and clearances for your specific product, which no general guide can.
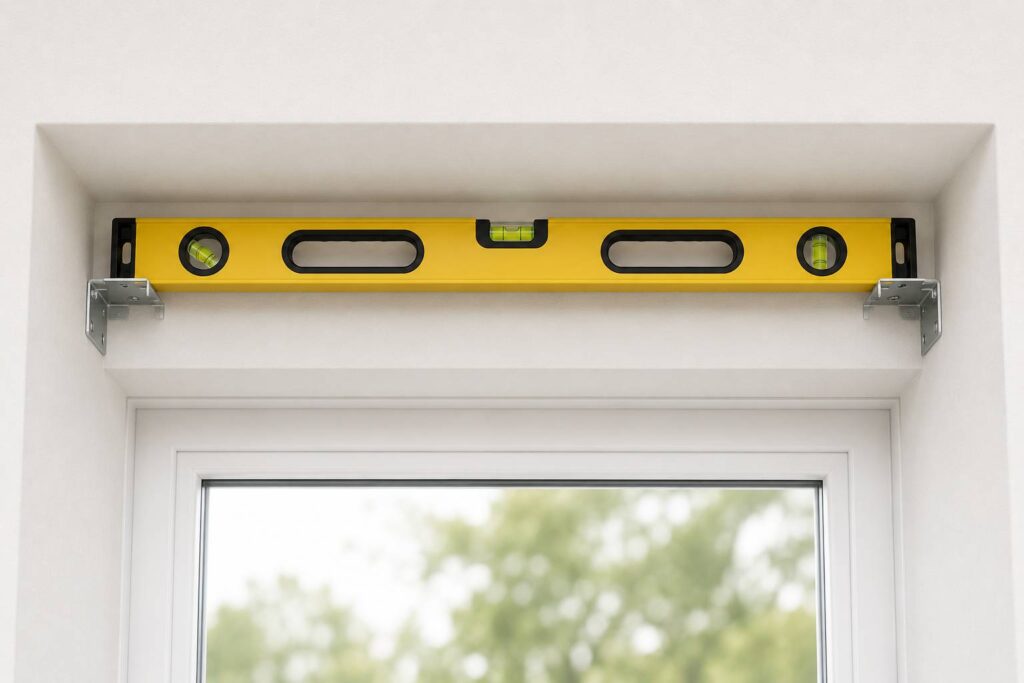
Drill and fix the brackets at the pencil marks you made during the measuring step. Fit both end brackets first, then any centre brackets.
Before you tighten the screws fully, lay the spirit level across the two end brackets and confirm they are level with each other. A bracket even a few millimetres out will show as a visibly crooked blind once the headrail is in. Adjust while the screws are still loose, then tighten.
The screws supplied with a blind suit a timber frame. Anything else needs a different bit and a different anchor.
| Surface | Drill bit | Fixing | Watch for |
|---|---|---|---|
| Timber frame or architrave | 3 mm wood bit for a pilot hole | Wood screws supplied | Always pilot the hole. Driving straight into hardwood architrave will split it. |
| Plasterboard with no timber behind | 8 mm bit | Toggle or spring anchor rated well above the blind weight | Find the stud first with a stud finder. A stud is always better than an anchor. |
| Brick or masonry lintel | 6 mm masonry bit, hammer function on | 6 mm nylon plug with an 8 gauge screw | Drill around 5 mm deeper than the plug so dust does not stop it seating flush. |
| Render over brick | 6 mm masonry bit, hammer function on | As per brick, using a longer plug | Start slowly with the hammer function off so the render does not blow out around the hole. |
Slide or click the blind’s headrail into the fitted brackets according to the manufacturer’s instructions. Most headrails either clip in from below or slide in from the front. Do not force the fit, as this cracks plastic bracket ends and the blind will then sit loose.
Once the headrail is seated, operate the blind through its full range. Raise and lower it, tilt it if it is a venetian, rotate it if it is a vertical. Check that it travels smoothly and that the bottom rail sits level when fully lowered.
If your blind comes with a pelmet or valance, clip it into place over the headrail. This conceals the brackets and gives the installation a finished appearance.
Corded internal window coverings in Australia are covered by the Competition and Consumer (Corded Internal Window Coverings) Safety Standard 2014, which regulates how they are installed. This is a legal requirement, not a preference, and it applies to you as the installer even when you are fitting a blind in your own home.
The rule in one sentence: a loose cord or chain must not be able to form a loop of 220 mm or longer anywhere below 1600 mm from the floor.
This is worth checking on any older blinds already in the house. An ACCC survey of display homes found that only around one in ten corded window coverings would have passed inspection as installed.
Measuring in the wrong unit. Australian manufacturers work in millimetres, and supplying figures in inches leads to ordering errors. Convert before you order: 1 inch equals 25.4 mm.
Skipping the recess depth check. An inside mounted roller needs a minimum recess depth for the barrel. If you order before checking it, the blind physically cannot sit flush and no adjustment will fix it.
Measuring an outside mount drop from the window opening. The drop starts at the bracket position, which sits 50 to 100 mm higher.
Levelling the brackets off the window frame. Frames in older homes are rarely level. Use the spirit level instead.
Not reading the product instruction sheet. General guides, including this one, cover the principles. The sheet covers the exact bracket positions, screw sizes and clearances for your product.
The blind does not hang level. Check that both end brackets sit at equal heights with a spirit level. Loosen the lower bracket, adjust and recheck before tightening.
The blind does not fit the opening. Verify which measurement you supplied, width or drop, and whether the inside mount deduction was applied by the manufacturer or expected from you. Contact your supplier with your original measurement notes.
The cord or chain binds. Check that the headrail is fully and evenly seated in both brackets. A headrail that sits slightly twisted will cause the mechanism to catch.
The blind rattles in the breeze. For inside mounts, child safe hold down brackets fixed from the bottom of the blind to the sill will stop the movement.
The blind drags or bows in the middle. The headrail needs a centre bracket. Anything over 1500 mm wide should have one.
You now have your measurements and your mount type. Because we manufacture at our Prospect factory, your blinds are cut to your figures rather than to a standard size, and there is no retail markup on top. Roller blinds start from $84, every order ships free Australia-wide, and manufacturing defects are covered by a 10-year warranty.
Enter your width and drop on the roller, venetian or vertical product page for an instant price, or send us your figures and we will check them before anything goes into production.
Yes. With a tape measure, spirit level, drill, screwdriver and the supplied brackets, most people can measure and fit blinds themselves by following the manufacturer’s instructions and the steps in this guide. Allow 30 to 45 minutes for your first window.
Yes, for light inside mount blinds. No-drill tension brackets grip the sides of the window recess and suit lightweight rollers in a deep, square recess. They are not suitable for outside mounts, venetians, verticals or any wide or heavy blind, because the load pulls the bracket out of the recess. If you are renting, check with your property manager first, as most leases allow bracket holes that are filled on exit.
Measure the width at the top, middle and bottom of the window, and the height at the left, centre and right. Use the smallest figure for each, then choose an inside or outside mount to suit the depth of your frame.
Recheck your measurements first. For an inside recess blind, we apply a standard 10 mm deduction at the factory, so a blind that measures 10 mm narrower than your recess is correct. If you deducted an allowance yourself as well, the blind will be 20 mm under. If the difference is not explained by that, contact us with your original measurement notes.
Yes. Under the Competition and Consumer (Corded Internal Window Coverings) Safety Standard 2014, a corded blind must be installed so that no loose cord or chain can form a loop of 220 mm or longer below 1600 mm from the floor. A chain-operated blind hung without its tensioner fitted does not meet that requirement.
Wipe venetian slats with a damp cloth and use a vacuum brush attachment to lift dust. For roller and fabric blinds, spot clean with a mild detergent on a damp cloth. Avoid harsh chemicals and abrasives, which damage surfaces and fade fabrics.
Run the blind through its full range every few months. If a cord feels stiff, frayed or uneven, deal with it before it fails. Regular use keeps mechanisms moving freely, and blinds that are rarely operated tend to stiffen.
Return to the manufacturer’s instruction sheet first, as it carries the exact specifications for your product. If the problem persists, most suppliers have a technical support line, and professional installers are available if you would rather hand the job over.